All bold keywords and other pertinent MSDN articles and references appear at the end of the post.
For this example, we will utilize the power of Data Binding and the InvokeCommandAction behavior in a UserControl.
Let's imagine this scenario: we are creating a web application, and need to perform the same task when multiple controls receive the Click event. In my real-life solution, I am building a shell using Silverlight 4 and MEF. This shell will act something like an OS in that multiple applications can be open at once, using "windows" to hold different and unique data. The "windows" are a UserControl that contains, among other things, a close button. One of my goals in developing this application was to use the Xaml architecture to the fullest - include as little code-behind as possible. Not that code-behind is bad, or even unwanted - because it is a requirement - I just felt that what all I could do in the Xaml would keep the code as clean and easy to debug as possible. This theory was even more impressed when I thought of what all different types of events I would need to include in the code-behind for something as simple as our "windows".
The resulting solution was to use data binding and behaviors. So, without further ado, let's jump into Blend and sort this out. What we start with is a UserControl with a bunch of added content, but let's focus on the elementbuttonClose control below.
From the Assets menu, on the toolbar or the tab, select Behaviors and drag the InvokeCommandAction behavior to the control and drop it.
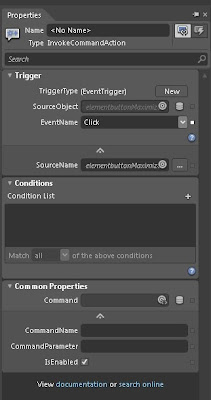
The result of this operation is that we have some new content added to our control and new properties become available on the Properties tab, as seen below.
Once we have this behavior attached to the control, we can now use data binding to perform the magic. However, there is some code to be created before we can entirely wire things up. Switching over to Visual Studio, we will need to create our command that will be executed. I created a folder called Objects and under that, another named Actions. This is where i created a new class called CloseModule. The actual class is quite simple and straight-forward, as can be seen from the snippet below.
As you can see, the class implements the ICommand interface. This is important because we could create a plain method, but that would prevent us from passing in parameters with as much ease. Implementing ICommand is as easy as Ctrl + . and selecting the appropriate option. Once the 2 methods are added, we can modify them to fit our functionality. For purposes of this command, the required method CanExecute always returns a true value, but depending on the circumstances you may want to add additional functionality or logic.
The execute method in my class will require the parameter value to be of type ModuleContainer, the "window" used to store data using MEF. The magic of this parameter is in the data binding, and for that let's go back to Blend. Our first order of business is to add a reference to our new ICommand class inthe App.xaml file. Optionally, you can add it as a resource in the Xaml page you will be calling it in, but I chose to make it a little more accessible. You can add it to any Xaml page like so:
Of course, you may need to add additional namespaces. After that, in the Properties tab of the Xaml page where our control resides, we can set our properties accordingly, using data binding.
Under the Trigger section, you can select the event, in this case Click. If you need to perform extended validation, the Conditions tab can also be used to bind to values of other controls, and based on the value, will enable the command or not. However, turning to the Common Properties section, we can use the Advanced options of the Command property to select the resource, as seen below.
Since, in this case, I want to close our "window" of content, I need some way to tell the close command which UIElement is actually being clicked on and closed. We can accomplish this by selecting Advanced options of the CommandParameter property and selecting "Element Property Binding..." This will change our cursor to be a mouse with a little target, and from there we can use the "Objects and Timeline" tab to select the root element, in my case "userControl".
The final step is to add the CommandName, in the case Execute. And there you have it. Your data binding and behavior control is ready to run.
If you liked this post, please forward it on or comment.


.bmp)
.bmp)
.bmp)
.bmp)
.bmp)
.bmp)
.bmp)